Replacing software RAID1 boot drives with UEFI

I replaced both of the drives in my RAID1 boot array on a Ubuntu server yesterday and had some struggles so I thought I would write down my experience both for my future self and any others who needs to do something similar. I think my main problem was following a guide that was not for UEFI setups 🙂

So, my setup is two NVMe drives on nvme0n1 and nvme1n1. Both drives have the same partition table:

  1. UEFI 512M
  2. md0 / boot 1G
  3. md1 / LVM <rest of disk>

Before starting, check that all disks are online:

# cat /proc/mdstat
 Personalities : [raid1] [linear] [multipath] [raid0] [raid6] [raid5] [raid4] [raid10] 
 md1 : active raid1 nvme1n1p3[2] nvme0n1p3[3]
       x blocks super 1.2 [2/2] [UU]
       bitmap: 3/7 pages [12KB], xKB chunk
 md0 : active raid1 nvme0n1p2[3] nvme1n1p2[2]
       x blocks super 1.2 [2/2] [UU]

So it should say [UU] and not [U_] or something else.

In my case I also did smartctl -ia /dev/nvme0 to write down serial numbers etc to know which physical disk to replace in the box.

Next up is to save a copy of your EFI partition for later use:

dd if=/dev/nvme0n1p1 bs=4M of=/root/EFI_PARTITITON.img

Pick one drive to start with and make it offline:

mdadm /dev/md0 --fail /dev/nvme0n1p2 --remove nvme0n1p2
mdadm /dev/md1 --fail /dev/nvme0n1p3 --remove nvme0n1p3

Physically replace the drive in the server. It might also be a good idea to do a firmware upgrade of the new drive if it’s available.

After disk is replaced, copy over the partition table from the remaining good disk to the newly replaced disk, and then generate new UUIDs for the partitions:

sfdisk -d /dev/nvme1n1 | sfdisk /dev/nvme0n1
sgdisk -G /dev/nvme0n1

Add the device back to the RAID1 array:

mdadm --manage /dev/md0 --add /dev/nvme0n1p2
mdadm --manage /dev/md1 --add /dev/nvme0n1p3

Monitor the rebuild status with a command like watch cat /proc/mdstat

If the rebuild is slow/limited to like 200MB/s you can change the max speed to eg 1.6GB/s with:

echo 1600000 > /proc/sys/dev/raid/speed_limit_max

After the resync is done we need to fix EFI, start by copying back the partiton we backed up before:

dd if=/root/EFI_PARTITITON.img bs=4M of=/dev/nvme0n1p1

Fix grub:

update-grub
grub-install /dev/nvme0n1

And lastly reinstall the UEFI boot option (for ubuntu):

efibootmgr -v | grep ubuntu  # only shows one entry
efibootmgr --create --disk /dev/nvme0n1 --part 1 --label "ubuntu" --loader "\EFI\ubuntu\shimx64.efi"

You should after this have two ubuntu entries from efibootmgr, and that should be it! Try rebooting and make sure boot works from both drives. If you need to replace the other drive follow the same procedure as above but use eg nvme1n1.

If the new drive is bigger you can also grow the RAID1:

mdadm /dev/md1 --fail /dev/nvme0n1p3 --remove nvme0n1p3
parted /dev/nvme0n1

Use resizepart command in parted to change the size.

Add back to the array:

mdadm --manage /dev/md1 --add /dev/nvme0n1p3

Wait for resync (cat /proc/mdstat) and then grow the array:

mdadm --grow /dev/md1 --size=max

Then you need to resize the filesystem, in my case it’s LVM with ext filesystem on top so:

pvresize /dev/md1
lvextend -L +1G /dev/vg-md1/lv-root
resize2fs /dev/vg-md1/lv-root

Or just resize2fs /dev/md1 if it’s no LVM.

Posted in hardware, linux, Uncategorized | Leave a comment

December updates, infra and vouching

I haven’t been posting in a while so I thought it was time to write about some small little things I’ve been working in the last week or so.

When I haven’t logged in to some servers for a while it can be hard to remember exactly how everything is connected, so I finally took the time and set up an instance of NetBox to keep inventory of both Blinkenshell stuff and my home network. I’ve heard about NetBox from colleagues in the business for a while but never used it, and now that I have I think it’s a pretty neat system and it seems to have a lot of support in the community regarding plugins etc. It took several hours to manually put in so far 30+ virtual machines plus some physical devices and then lots of IP addresses, prefixes, ASNs, VLANs and connections in there but I hope it will be worth it!

I also set up CheckMK monitoring in addition to the nagios that already exists but is mostly used for monitoring as an external viewer from the outside. CheckMK has many detailed checks and good system for putting up “rules” to control thresholds/limits and exceptions per host or per other labels. So far I really like it although it uses quite a bit of CPU resources just for monitoring. It also has some neat integrations so I hope to get the grafana instance to show some CheckMK data in the same dashboards as other stuff.

I’ve also been working on the firewall setup a bit, and had to make a few changes after an upgrade. More changes are coming later hopefully within a month or so and might cause some short disconnects etc. Sorry for kicking people out from SSH on Sunday, oops!

After a (very short) discussion on IRC I also decided to change the vouching system to only require a 1 hour wait period after creating an account instead of the previous 24h wait period. I think in the year 2022 people are just much too impatient to wait 24h for anything, and someone leaving social media alone for a few minutes to figure out how to join IRC is in itself maybe a sign that it’s a pretty serious person 🙂 The old limit of 24h seems to have been in place since at least 2008, a time before Instagram or even the Google Chrome browser!

In general I think that we as a community has to change our views a bit on how much work we expect from someone before we vouch. Lately it seems like fewer people has been vouched in, and we definitely need new people coming in to keep the community alive! Thanks to everyone out there taking time with new members and vouching, gold stars to all of you! <3

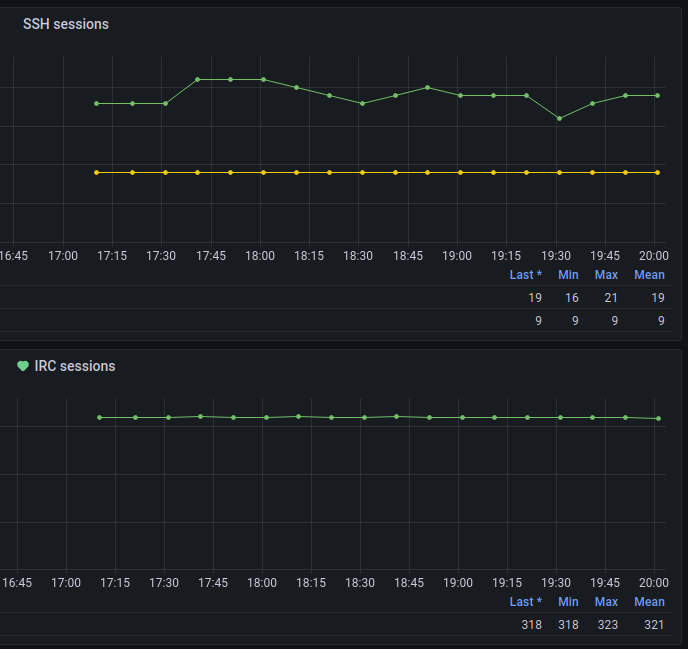
I also made a litte statistics counter on the main webpage where you can see how many active SSH sessions the server has for v4 and v6 respectively, and some other stats. It was not very easy with all the security profiles in place on the shell server, I ended up actually building a Go binary to get the data from proc tcp so I could bind specific policies to that binary (not so easy with shell scripts). It was my first time in Go but a very simple project and I was happy with it 🙂 (Of course I also set up a little grafana dashboard for the new stats, I hope I can expose some of that later.)

grafana dashboard

That’s all for now! I’m going away for a few days so merry Christmas if I don’t see you in chat before 🙂

Posted in Uncategorized | Tagged , , | Leave a comment

IRC communities migrating to Libera.Chat

A lot of worrying news about the Freenode IRC network has been unfolding during the last week, and events today seem to have pushed a lot of big communities like Ubuntu and Gentoo to move from Freenode to other IRC networks like the new Libera.Chat IRC network instead.

Exactly what has been going on behind the scenes are still not clear to me but it seems like the network has forcefully (via lawyers) been taken over by new people that does not have the IRC communities best interests in mind. All the old staff has resigned and started a new IRC network called Libera.Chat with the same philosophy as the old Freenode network used to have.

If you have the time please read up on the various links, news, reports and chat logs from what has been going down, but for me the final straw was today when the new Freenode staff took over hundreds of existing IRC channels and kicking existing channel owners. I think it’s time to /disconnect from Freenode and add a new network to your list instead: Libera.Chat !

This is a small howto for irssi users:

/network add LiberaChat
/server add -network LiberaChat -auto -tls -tls_verify iridium.libera.chat 6697
/connect LiberaChat

Then register your nickname via NickServ:

/msg NickServ REGISTER YourPassword youremail@example.com

Verify via instructions in the Email within 24 hours.

Then add SASL authentication so every time you connect you will get authenticated:

/network add -sasl_username yourname -sasl_password yourpassword -sasl_mechanism PLAIN LiberaChat

Join all your favourite communities and then feel free to disconnect from Freenode 🙂

Posted in irc | Leave a comment

Server overview 2021

I haven’t really talked about the backend infrastructure for Blinkenshell in a long time, so I thought I would give an update on the servers/VMs that are currently running as of now. Most people probably think it’s just a shell server and that’s it, but in reality there’s almost 25 different VMs involved in running Blinkenshell!

  • Triton (SSH)
  • Buildserver
  • Web server backend
  • Web server front/cache
  • Database replication slave
  • Mail server
  • /home storage server
  • Blinkenbot and signup utils
  • 2x IRC servers
  • ACME
  • Nagios monitoring server
  • Telegraf/Grafana monitoring server
  • Log server
  • Off-site backup
  • 3x LDAP
  • Tunnel server IPv4
  • Tunnel server IPv6
  • 3x Firewall

Why so many? The most important reason here is mostly security again, to try and isolate different parts from each other as much as possible by running on different VMs with firewalls in between. It’s also a lot more flexible when making upgrades/changes to only take down one part at a time. But still, is 25 VMs really required? Probably not, but I like labbing and testing out some different things! There’s actually even more VMs than the ones listed above but they’re not required to run the service but more of lab/test things.

If you want to help support the running costs of Blinkenshell please consider supporting via Paypal or Patreon 🙂 Any anything you want to see/know more about? Let me know!

Posted in hardware | Leave a comment

KVM storage live migration

One of the features I’ve been most excited about with this new server setup is KVM live migration using virsh migrate with copy-storage-all. This is like a regular VM live migration, but you can do it even if you don’t have a shared storage for your KVM hosts (shared storage is usually a dedicated NAS for VM disk images). I don’t want to be dependent on too much hardware and I feel like a NAS will add a lot of gear, both in terms of the actual NAS which you might want to add some redundancy to, but also in terms of network equipment (like do you want redundant switches?).

My goal with this setup is to be able to do some hardware maintenance on hosts, as well as upgrading of the KVM host software and firewall software without having to take everything offline. If there is some unexpected hardware failure everything will still go offline and there is no fast way to recover from that but I’m OK with that for now. I also want the setup to be reasonably simple, so I wanted to stay away from any kind of clustering file systems that probably will not work well on just two hosts.

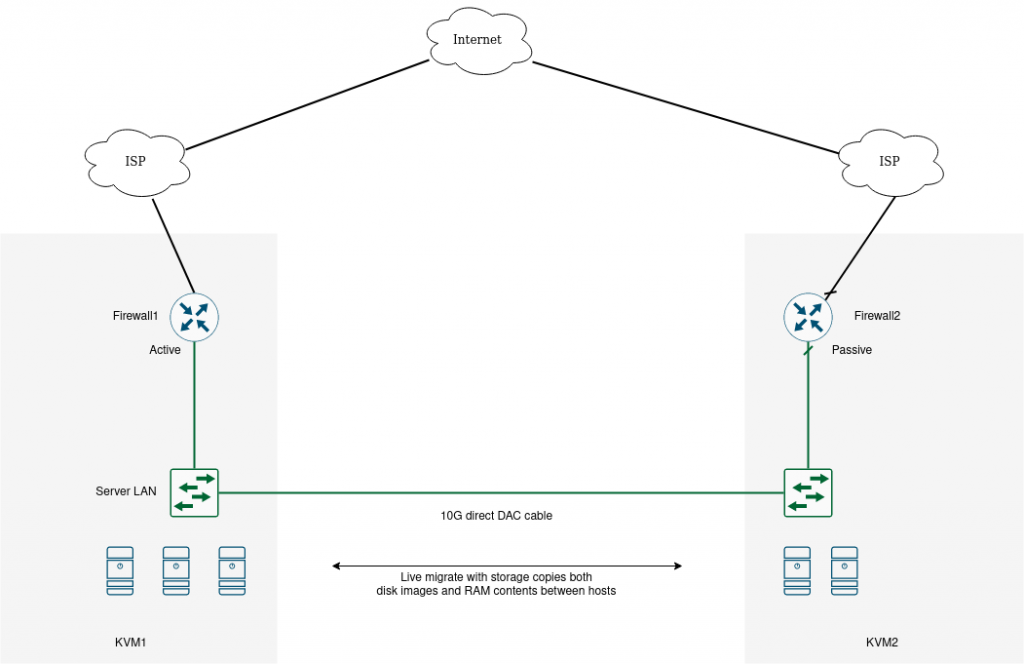
This is a simplified view of the setup I went for:

Blinkenshell 2021 KVM host setup

Both KVM hosts were actually installed about the same time and has been running since the server migration. The second internet connection was added later however, and I wasn’t able to test the internet failover part before we went live. I did however do some tests migrating VMs between the hosts, but was not possible to completely power off one of the KVM hosts since that would result in losing internet connectivity. A couple of weeks ago I added the second internet connection and have been working on the firewall setup to make failover possible, I might do a separate post about this if someone is interested.

So, how do you actually migrate a VM between two KVM hosts without having a shared storage? First we should probably discuss the actual software setup in a bit more detail. I’m running Ubuntu hosts with KVM and manage my VMs using libvirt, either by using virsh on the command line or preferably using GUI via Virtual Machine Manager / virt-manager. I’ve also enabled libvirtd tcp socket on a dedicated VLAN on the 10G trunk between the hosts to make the copying faster. I did this by overriding a few settings in the ubuntu included systemd libvirtd-tcp.socket: systemctl edit libvirtd-tcp.socket

[Socket]
ListenStream=
ListenStream=<local-copy-vlan-ip>:16509
IPTTL=1

And enable the socket: systemctl enable libvirtd-tcp.socket.

The magic is then accomplished by adding the option --copy-storage-all to the virsh migrate command, something like this:

virsh migrate --p2p testvm1 --undefinesource --persistent \
 --copy-storage-all qemu+ssh://<other-host-ip>/system tcp://<other-host-ip>

There are lots of options to virsh migrate depending on what you want to do. In my case I want to migrate the VM testvm1 to a new host, and I want to have the VM running permanently on the new host until I make some other change. undefinesource and persist will make it so that the VM configuration is removed from the old host and only appears on the new host after, where it will be kept in a persistent state (instead of just a temporary move). copy-storage-all will make sure to copy the contents of all local disks attached to the VM, but you have to make sure to create empty qcow2/raw disk files on the new host with the correct sizes before you can start the migration! It’s important they have the same name and size as on the original host. I also include some options to have the actual data transfer on this dedicated copy VLAN.

In my case most VMs are very small, and a copy including storage of a very small VM can complete in something like 30 seconds. A large VM with a few hundred gigabytes of storage takes almost 20 minutes to copy. The storage I’m using is a few generations older NVMe SSD, in RAID1 setup they manage to write at around 1GB/s which fits pretty nicely with 1x10G NIC for the network. I actually connected 2x10G and was hoping to get 2GB/s but the write speed after RAID was a bit slower, but still good enough for my scenario.

The actual news in this post is that yesterday was the first time I actually completely powered off the KVM1 host to connect a UPS, and I managed to use this storage live migration to move triton (the SSH server) off from the KVM host, perform my maintenance, and move triton back without disconnecting any IRC sessions! So both KVM migration and firewall failover worked, yay! It’s still kind of a tricky maneuver so I fully expect I will mess it up next time 😀 Stay tuned

Posted in hardware, maintenance, network | Leave a comment

Fail2ban routing actions

I said I should be doing some more technical posts so here we go! Blinkenshell runs the SSH server on a non-standard port (mainly port 2222, but also port 443 for people trying to avoid some firewalls), and the reason for doing this is to avoid some automated bots that go around the internet scanning for open SSH servers and trying different bruce-force attacks to log in. I still think this non-standard port helps a bit, but there’s always some more persistent attackers out there that find SSH servers running on other ports and start hammering away there as well, and for this reason we have fail2ban. Fail2ban will scan through any logfiles you specify and apply certain filters/patterns to find failed login attempts, and if there are repeated failed attempts it will try to perform different actions like blocking the source IP using iptables. For Blinkenshell I try to avoid running too many programs on the main SSH server triton because of security reasons, so our setup is a little bit different.

The first part of the puzzle is rsyslog running on triton sending syslog messages over UDP to a separate log collection server. This is useful for several reasons like trying to figure out why a server crashed or to get forensic data after a host was compromised. In this case we’re going to use it to be able to run fail2ban on a separate host from the one we’re trying to protect. So we install fail2ban on the log collection server and set up a new “jail” that will listen for logs coming from triton. Something like this:

[sshd-triton]
port = ssh,2222
logpath = /var/log/remote/triton.log
enabled = true
filter = sshd[mode=aggressive]
banaction = route

The second part of the puzzle is hinted at the last line “banaction = route” here. Since fail2ban will not run on the same server as the server we’re trying to protect any iptables rules that we install locally on the fail2ban server will not stop the attackers. The idea here is to add any banned IPs to the local routing table, and then send these routes to the firewall and drop the traffic there. This will require a routing protocol daemon running on the fail2ban server that talks to a routing daemon on the firewall.

In my case the fail2ban server runs on Linux so here I’ll choose FRRouting (FRR) for the routing daemon. My preferred choice of routing protocol for cases where you want to specify some routing policy is BGP, so I’ll enable the bgpd in /etc/frr/daemons and systemctl restart frr. You can then enter a cisco-style cli using the command “vtysh”, and go into configure mode using “configure”. Sample config:

ip prefix-list BLACKHOLE seq 5 deny 10.0.0.0/8 le 32
ip prefix-list BLACKHOLE seq 10 deny 194.14.45.0/24 le 32
ip prefix-list BLACKHOLE seq 15 permit 0.0.0.0/0 ge 32
!
route-map BLACKHOLE permit 10
 match ip address prefix-list BLACKHOLE
!
router bgp <myasn>
 neighbor <firewallip> remote-as <firewallas>
 !
  address-family ipv4 unicast
   redistribute kernel route-map BLACKHOLE

To try and avoid any accidental dropping of legitimate traffic I’ll add a little route-map to deny my local prefixes first, and then allow any /32 routes. The “redistribute kernel” line is what will actually take the routes that fail2ban added to the kernel routing table using “banaction = route” and add them to the BGP table.

On the firewall end I’m using OpenBSD so there we will be using openbgd instead of FRR, so it’s a completely different syntax! I’m actually already running bgpd for other things on the firewall (maybe more updates on this later!), but the relevant parts to this fail2ban blackhole thing are:

prefix-set accept-blackhole-in {
    0.0.0.0/0 prefixlen = 32
}
neighbor <fail2ban ip> {
    remote-as <fail2ban as>
    descr "fail2ban"
}

allow from <fail2ban ip> prefix-set accept-blackhole-in set pftable "blackhole"

Again, another filter to only accept /32 routes so we don’t ruin other routing by some misconfiguration. The other key part here is: set pftable “blackhole”. This will add any routes received from this neighbor to a table in pf. We can then refer to this table when writing firewall rules in pf like so:

table <blackhole> persist
block in quick log on $if from <blackhole> to any

Or if you want you can re-route the traffic to some honeypot etc with “route-to” options in pf. This will block all traffic from the banned IP in the firewall, so that IP address will not be able to reach any other services hosted behind the firewall either. This could be seen as extra protection, but it could also cause even more confusion for users that accidentaly type the wrong password too many times and then can suddenly not reach any other services either 🙂 We’ll see how it goes!

Let me know if you’re interested in more technical stuff like this

Posted in Uncategorized | 1 Comment

New server up and running

I’m happy to report that the big maintenance window yesterday was successful and we are now running live on the new server hardware! I’ve spent a lot of time earlier this week doing final preparations and planning the exact steps to take during the migration because I knew there was going to be a lot of work to do during the migration and many things that could go wrong. I felt a bit nervous going to bed on Friday evening before the big day, but I also knew I had done a lot of preparation so I still slept very well 🙂

Saturday morning started with some final preparations relating to the network setup. I had to disconnect both internet and my management connection to the new server to be able to then change it over to the final network configuration. I didn’t want to have to spend lots of time just trying to get back in to the server if anything went wrong so I set up an of out-of-bands connection to the server via a separate laptop for emergencies, then I rebooted the firewall on the new server to apply all the final changes and crossed my fingers I would still be able to log in after moving some network cables over to their new ports, and it all worked out on the first try!

The next step was to copy over a lot of data to the new server. I had tested this out with some less important virtual machines earlier so I knew roughly what to expect. I shut down the web server at 09:43 (according to twitter) and started the copy which took around 20 minutes. Here I also have to convert from vmdk format of disks used by ESX into the qcow2 format used by the KVM hypervisor. Things progressed pretty much as expected here and I continued with the mail services, directory services, ircd and lastly shut down the SSH/triton server.

Once all the services were down I could start copying all of the user home directories. I had prepared this by doing a ZFS snapshot and transferring it to the new server the day before. I did a final snapshot and then started an incremental “zfs send” operation to sync over any files that had changed in the last day. This seemed to work well, but then there was an error message for just one directory. I went to investigate and found that some of the directories did not have the snapshot that I thought I transferred the day before. This is exactly the kind of problem I did not want to run in to at this point 🙂 I knew doing a full copy of all the directories would take somewhere around two hours and I did not feel like sitting around waiting for that long so I devised a little script that would transfer just the missing directories over which was much faster, crisis averted! 🙂 At this point it’s around 12:31.

The next step is to actually disconnect the old server from the internet entirely and move over to the new server and firewall setup. This involved some more network patch cabling, lots of firewall rules and some routing. This went pretty well but there’s always some firewall rules that you miss, which sometimes requires doing some tcpdump work to figure out what’s actually going on. Anyway, around 14:01 things were starting to look pretty good in this area as well.

Next was lots of messing around with NFS exports, since I moved from a Solaris based OS called Nexenta to Linux the options for sharenfs had changed somewhat. Also more firewall rules.

Mail was the first service I wanted to get up and running so that’s what I started working on next. I know mail servers should try and resend mail for something like two days before giving up, but if I ran in to any problems I wanted to have as much time as possible to figure it out before any emails would get lost. This went well and I only had minor configurations to update to get it up and running. I also started up directory services and ircd which went pretty well, just some regular OS updates etc. Now it’s around 16:22.

Web services were next, here I had to do some more troubleshooting and I had actually forgotten to copy some data for the wiki so I had go back and move that over. At 18:23 web was back up and I was starting to feel pretty confident 🙂

Lastly I started up the new SSH shell server that I have been preparing for about a month. It has the same hostname and ssh-keys etc as the old triton server and I tried to replicate the environment as well so hopefully it’s not totally strange. It’s running Ubuntu linux instead of Gentoo as I mentioned in the previous post. Here I had actually misconfigured the primary IP-address and when I went to change it I messed up the NFS mounts which make things very weird I had a hard time ever shutting the server off because of hanging processes. Eventually I got back using the correct IP and I sent a message on twitter at 20:48 letting people know it was possible to log back in again. I took a well deserved break and had a a fancy hipster beer and watched some Netflix to relax 🙂

As far as I know things are mostly working fine on triton now, but there has been reports of some weird color garbage on the terminal after detaching from gnu screen (time to change to tmux?). I haven’t able to figure this one out so if you know what’s causing it please message me. Also two users had problems this morning that their /home got unmounted so I had to manually remount it. I’m not sure what was causing this but I’ll keep an eye on it. Other than that it’s mostly been some missing packages etc that I have been installing as we go.

There’s still a lot more to do before the move is complete but so far I’m very happy with things and I’m a bit less worried about the old server breaking down. Next on the agenda for me is getting blinkenbot and signup back up and running. There’s also work to get IPv6 back, and also lots of work on the back end infrastructure. Please let me know if you want to read more about the new setup, I’m thinking I should write more about how the final setup looks like now (or when it’s more finished).

Posted in Uncategorized | 2 Comments

Server updates 2021

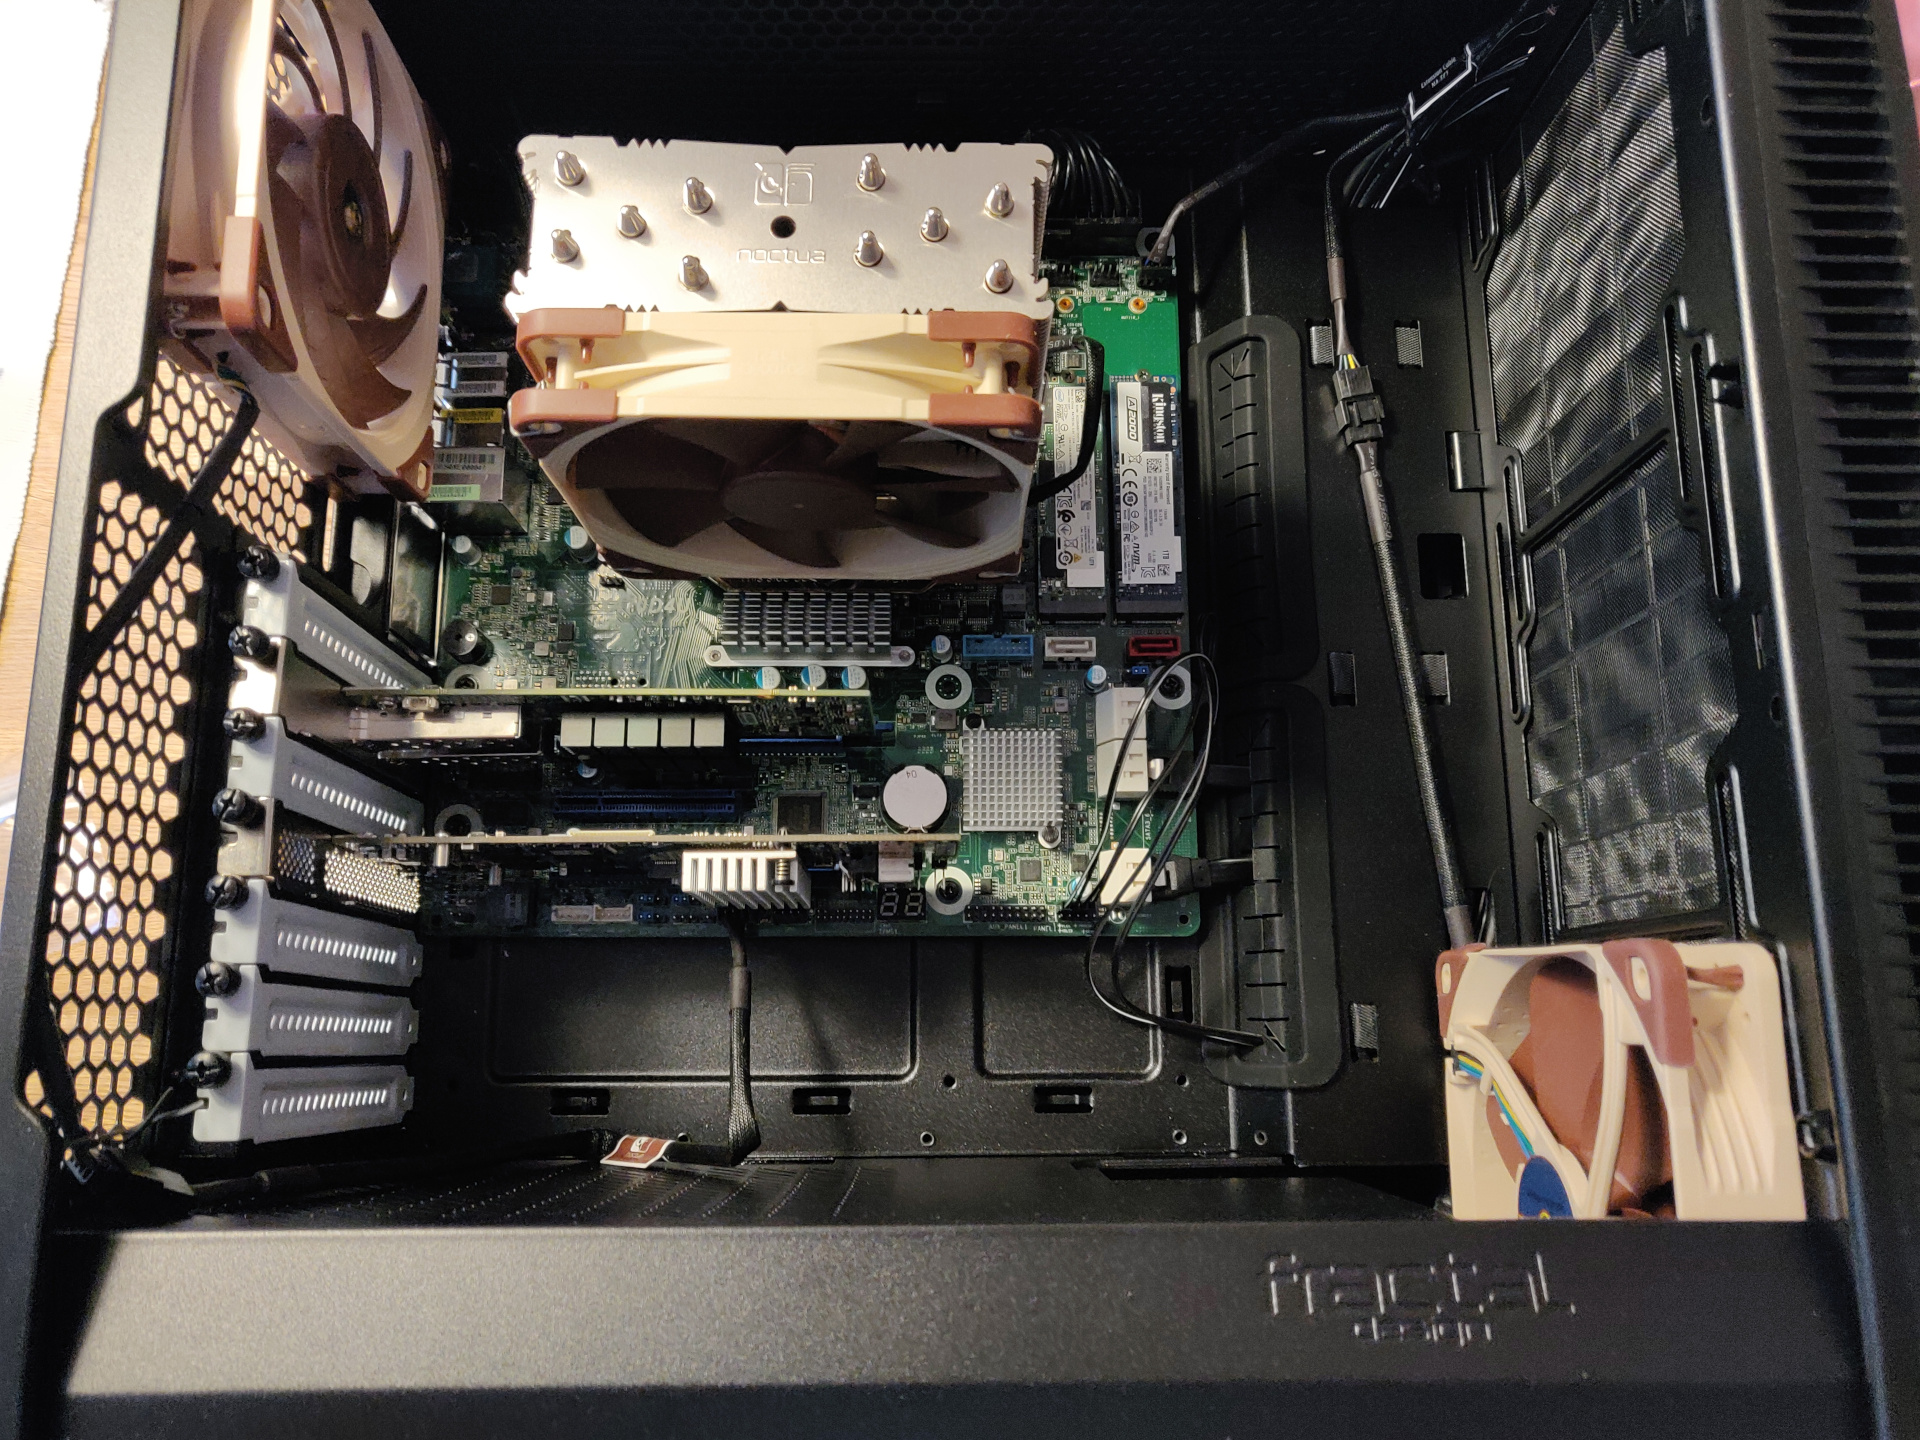
Some of you might have caught a teaser picture I pasted on IRC a couple of weeks back of some server internals. This is actually what’s going to become the new main server for Blinkenshell in 2021! The current server is doing a fine job even though it’s very old, but I think it’s finally time to get a replacement to extend the life for hopefully many years. I’ve been thinking of new server hardware for a very long time, probably a year at least, and finally decided to start ordering some parts at the end of last year.

The last parts for the new server(s) arrived around the end of January and so I’ve been working very hard for the last month to get things up and running, performing different tests and experimenting with new ideas. Things are going to stay mostly the same but a lot of back end stuff is getting reworked. Everything is not decided yet but I want to post more build posts after I’ve “launched” things.

One change that you will probably notice in some way is that the SSH server “triton” is gonig to switch from Gentoo Linux to Ubuntu which means software package management is very different. I’m also trying my best use more standard components like systemd here, and even though it was a lot of pain in the beginning getting it to work the way I wanted now I’m actually pretty pleased with it. We’re also replacing SELinux with AppArmor, but I hope users will not notice too much change there. A lot of things are still very much custom though, like the kernel, AppArmor profiles, shell setup and so on, and security is still top of mind!

I’ve been working extra hard these last few weeks because I don’t want this move to drag on forever. My plan is actually to switch the SSH server and all of the underlying infrastructure next weekend on Saturday the 27th of February. This is going to be a huge maintenance window and I expect most services to be offline for the entire weekend. Hopefully mail services can get back online on the same day, and SSH services by evening Sunday the 28th (no promises though!). I don’t expect all services to be back online that soon however, things like blinkenbot, signup and even IPv6 might take quite a while longer before they are fully functional again.

I would also like to recommend everyone to make an extra backup of your files before the 27th just in case, I have no reason to believe there would be any data loss from the move but it’s always good to keep backups and you might want to access something while the server is down.

Posted in hardware, maintenance | Leave a comment

HTTPS for User Websites

User websites has been a part of Blinkenshell since the very early days, and the format has stayed pretty much the same. However, the web has evolved a lot and nowadays many visitors expect HTTPS by default. Because of this I’ve setup a Let’s Encrypt wildcard certificate for *.u.blinkenshell.org and I hope to migrate over user websites there.

For now, any new users signing up will automatically get the new domain name <username>.u.blinkenshell.org and HTTPS. Existing accounts still keep their <username>.blinkenshell.org and no HTTPS for the time being, but contact me if you want to migrate over to the new domain name and HTTPS. I can also set up a redirect from the old domain name so external links will not break when making the move.

On another note, Blinkenshell is still running PHP 5.x but will have to migrate over to PHP 7.x very shortly so if you have some old code running make sure it’s compatible as soon as possible!

Posted in Uncategorized | 1 Comment